 Bars
Bars
 Beads & Spheres
 Bolts & Nuts
 Crucibles
 Discs
Discs
 Fibers & Fabrics
 Films
Films
 Flake
Flake
 Foams
Foams
 Foil
Foil
 Granules
 Honeycombs
 Ink
Ink
 Laminate
 Lumps
Lumps
 Meshes
 Metallised Film
 Plate
Plate
 Powders
 Rod
Rod
 Single Crystals
 Sputtering Target
 Tubes
Tubes
 Washer
 Wires
Wires
 Converters & Calculators
 Write for Us

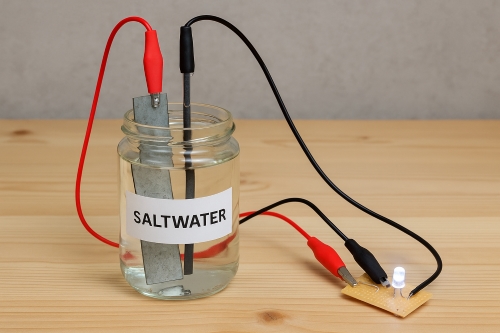
STEM in Action: Build Your Own Saltwater Battery

Introduction
Saltwater battery shows the practical side of science, technology, engineering, and mathematics. It is a great way to understand basic electrical circuits and chemical reactions. You do not need expensive equipment. With things found at home or in local stores, you can see energy in action.
How A Saltwater Battery Works
A saltwater battery uses a simple chemical reaction. Salt dissolves in water to create a solution with charged particles. These charged ions move between two different metals. Each metal serves as an electrode. One electrode gives off electrons, and the other accepts them. This electron flow is what we call electricity.
In a saltwater battery, the reaction between the metal and the salt solution is key. When the metals come in contact with the saltwater, electrons flow from one metal to the other. This flow creates a voltage difference. The energy produced may be small. However, it is enough to power a small light-emitting diode (LED) or a low-power device.
This system is safe for home projects. There is no risk of harsh chemicals. Every step is a chance to learn about the basics of chemistry and physics. The simple process also helps us see how batteries work in everyday gadgets.
Materials You Will Need
For this project, you will need a few common items. The list is as follows:
• Two different types of metals – for instance, copper and zinc. You can use copper wires or copper strips. For zinc, many use galvanized nails or zinc strips. Using two metals is necessary for the chemical reaction.
• Salt – table salt works fine. Avoid iodine-based salts as they may affect the process.
• Water – tap water will work, though warm water speeds up the dissolving process.
• A container – a small cup or a clean jar will do nicely.
• Wires with alligator clips – these help connect the battery to a device.
• A small load – such as a light-emitting diode or a digital clock that takes low voltage to see the power.
• Optional items – multimeter for checking voltage, extra metals for creating battery cells in series.
All these items are easy to get at home or from a local hardware store. The materials teach the importance of budgeting and resource management. They are an excellent starting point for beginners in science.
Step-by-Step Instructions
Follow these simple steps to build your saltwater battery. I will keep each step clear and easy to follow.
1. Prepare the Saltwater Solution
Fill your container with water. Add a teaspoon of salt to the water. Stir the solution well until the salt is completely dissolved. A clear solution indicates that the salt has worked its way into the water.
2. Insert the Electrodes
Place your two metals into the saltwater solution. Make sure they do not touch each other. They should be at a small distance apart. This gap helps the ions move freely between the electrodes.
3. Connect the Wires
Attach wires to each of the electrodes. Use alligator clips for a secure connection. Ensure the wires are firmly connected. One wire connects to one metal, while the other connects to the opposite metal.
4. Link to a Load
Connect the free ends of the wires to your load, ideally a light-emitting diode (LED). The LED will light up if the battery is working properly. If the LED does not light up immediately, check your connections and the saltwater solution.
5. Testing and Observation
Using a multimeter, check the voltage difference between the two metals. Expect a low voltage reading, usually less than one volt per cell. If the voltage is low, you may connect several cells in series. This increases the overall voltage. Each added cell contributes its voltage difference to the total.
6. Experiment and Record
Write down your observations. Note how long the LED stays lit. Consider any changes in the solution or electrodes over time. This recordkeeping is valuable for STEM learning and further projects.
This step-by-step process is simple and straightforward. It is a fun way to observe the conversion of chemical energy into electrical energy.
STEM Learning Opportunities
This project provides many learning opportunities. You see firsthand the conversion of chemical energy to electrical energy. This conversion is the same principle behind common batteries.
You will also learn about the roles of positive and negative charges. I have seen students gain a clearer understanding of ions and electrical circuits through such hands-on projects. The experiment shows basic principles in chemistry and physics.
In addition, the project offers hints about design improvements. For example, students may try different metal pairs. They can compare voltage levels between copper/zinc and copper/iron combinations. Increasing the number of cells to form a battery pack adds another lesson. This practice reinforces arithmetic skills and logical reasoning.
Many extended applications can be considered. The saltwater battery idea can lead to projects involving renewable energy or low-power electronics. In these cases, real data such as voltage ratings, resistance measurements, and lifetime performance are useful. One can refer to similar experiments in science journals or simple engineering textbooks that discuss battery efficiency and limitations.
The hands-on experience fosters an inquisitive mind. It invites discussion around the efficiency of various chemical reactions and materials chosen. Such projects are a great start for deeper study in science and engineering.
Applications and Extensions
A saltwater battery can power small devices. For instance, a low-power LED is often used in science projects. With several cells in series, it may run a small digital clock or sensor. This helps in understanding low-power electronics.
This project also lends itself to creative extensions. Students may try different salts or metals. They might see which salt solution gives the best performance. Such comparisons remind one of work done in chemical laboratories where reaction parameters are carefully measured.
Engineers sometimes use similar ideas for educational models. In classrooms, teachers use simple batteries to show energy conversion. Some hobbyists extend the project into creating more complex battery arrays. An array of cells might power a remote-controlled car or a simple robot. These projects connect the basic principles to practical, everyday applications.
Historically, similar batteries have been used in educational settings to explain electrical circuits. For example, early experiments with voltaic piles paved the way for modern battery technology. Using a saltwater battery shows the evolutionary steps from basic science to modern electronics.
Conclusion
The saltwater battery project is a simple way to see science in action. You use basic parts to create a system that converts saltwater into an energy source. The experiment is safe and practical.
A saltwater battery may not replace commercial batteries. However, it serves as a great learning tool. Whether you are a student or an interested individual, it shows how everyday materials play a role in energy systems. In summary, this project illuminates the important connection between simple science experiments and the technology we use today. For more tech support, please check Stanford Advanced Materials (SAM).
Frequently Asked Questions
F: What causes the electrons to move in the saltwater battery?
Q: The metal difference and the saltwater solution create a chemical reaction, prompting electrons to move.
F: Can I use any salt for the battery?
Q: Table salt works best. Avoid salts with additives that may hinder the reaction.
F: How do I increase the battery's voltage?
Q: Connect more cells in series. Each cell adds to the overall voltage.


 Chin Trento